
Jira Service Management journeys: an offboarding template driven by the termination date

13 min readNovember 11, 2026
Key takeaways
- A journey item can copy its Reporter from the request: paste {{journeyParent.reporter}} into the item's Reporter field. Left empty, all 9 such items on our site got the admin who published the journey as Reporter.
- Item conditions offer 10 operators and no less than or equal. On or before today becomes less than {{now.plusDays(1).jiraDate}}, which is calculated in UTC.
- A journey can't create a work item on a calendar date. A daily scheduled automation rule made the missing task for the one due request that lacked it and made no duplicate on the next run.
- Publishing an edited journey makes a new automation version and switches the old one off. The docs say running journeys are safe, but public bug AUTO-2496 (In Progress) says they get aborted.
On 28 July 2026, Rune Rasmussen wrote under Atlassian's post New updates to Journeys in Jira Service Management that the actor behind a journey's automation rule is whoever created it. "So if I configure an Onboarding Journey for our organization, it'll look like I'm the one hiring everyone," he said, and he'd tried changing the actor without luck. If you run HR requests in Jira Service Management, you've probably seen it too: the tasks a journey makes all seem to come from the admin who built it.
On 10 and 11 November we built an employee offboarding journey on our Premium test site to see how far you can get without an app. The termination date (the HR template calls it Last working day) drives one of its tasks. A journey condition creates that task straight away when the day has already come, and a small daily automation rule creates it later for requests raised in advance, because a journey can't wait for a date. The Reporter turned out to be fixable per work item: with {{journeyParent.reporter}} in the item's Reporter field, the requester came out as Reporter on all 7 test requests.
We hit a few more limits on the way. Item conditions have no "less than or equal". "Today" is worked out in UTC. And Reporter is the only part we could change: the history still shows the admin's account making the item. Each step below includes the workaround we used.
- 1
Turn on Journeys in your service space settings.
- 2
Build the journey type with three offboarding tasks and the requester as Reporter.
- 3
Add a date condition so one task needs the last working day to have come.
- 4
Publish the journey and learn what an edit does to running journeys.
- 5
Add a rule that copies the Reporter onto any task that missed it.
- 6
Add a daily rule that creates the dated task for requests raised in advance.
Before you start: plan, role and the HR template
Prerequisites
- Jira Service Management Cloud, Premium or Enterprise, with a company-managed service space (ours came from the HR service management template).
- Space admin to switch Journeys on, and a Jira admin for the two rules in Steps 5 and 6, which we built from the global automation page.
- Tested on wolfaenpak.atlassian.net, our test site, on 10 and 11 November 2026.
Journeys are a Jira Service Management Cloud feature. A journey type is the reusable definition: one request type plus the work items to create for each request of that type. Atlassian calls the request a journey is built on the journey parent. So a journey type works as a native offboarding template. You define the tasks once, and each new offboarding request gets them.
You'll need Premium or Enterprise. Atlassian's Rahil Hameed said so in the Journeys now in features post on 29 September 2025, though the support docs don't print a plan. Our test site runs Jira Service Management Premium.
The HR service management template saved us some setup: it already comes with an Offboard an employee request type that has a Last working day date field. Atlassian's doc says you need space admin permissions to switch Journeys on, and we did all of it as a site admin.
One more thing about status. Atlassian's Create a journey type page still carries the feature lab banner ("features that are currently in development"), while the Community post above says journeys moved out of the lab into Features. I'd treat it as a feature that still changes often.
When you're done you'll have an Employee offboarding journey with three work items and a date condition on one of them. You'll also have two small automation rules: one copies the Reporter, the other creates the date-driven task when its day comes.
How Jira Service Management journeys create work items
A journey starts when its journey parent is created. Atlassian's trigger page says the trigger "will always be pre-set as when your journey parent is created", though you can have Workday start it through an automation flow instead. At that moment the journey creates its work items, in any space, and links each one back to the request.
Whether an item gets created depends on its conditions and dependencies. Item conditions compare two values, and each work item can have up to five conditions, all joined with AND. Dependencies can hold an item back until an earlier item reaches a status ("stopping subsequent work items from being created", in the dependencies doc). So a journey can create items after the request, but only when something moves in Jira. It never waits for a date.
Behind the builder, a journey type runs as an automation rule. Atlassian's About journeys in Automation page says so, and our site showed it too: publishing created a rule called "Employee offboarding - Journey V1". Its actor (the account the rule acts as) was our admin, who had built and published it. That was one account on our site, so we can't tell you whether the builder or the publisher wins when they differ. Each item step creates the work item, waits a random 3 to 10 seconds and then adds a Relates link to the request. That wait matters in Step 5.
Step 1: Turn on Journeys (Premium and Enterprise plans)
- In your service space, select More actions (•••) next to the space name, then Space settings. The settings sidebar opens.
- In the sidebar, look for Journeys between Automation and Playbooks. On our site it was there in a brand-new space without any toggle; if you see it, go to item 4.
- If Journeys is missing, select Features and turn on the toggle next to Journeys. It may sit under a Feature lab heading.
- Select Journeys. The empty page says "Streamline processes across your spaces".
You should see two buttons: Create a journey type and Create with Request Resolver. Request Resolver (formerly Rovo Service) is Atlassian's AI helper, and its onboarding doc shows it drafting an onboarding journey. We built ours by hand.
Step 2: Build the offboarding journey type (a native Jira offboarding template)
- On the Journeys page, select Create a journey type. A dialog opens.
- In the dialog, type
Employee offboardingin Journey type name and pick Offboard an employee in Journey parent. Then select Create. The builder opens with a Draft label and a trigger card: "When: Work item created". - Select + Add work item to open the Add work item dialog.
- Set Name to
Revoke laptop access, Space to your service space and Work type to Task. These all sit in the top half of the dialog. - In Summary, type
Revoke laptop access:and then paste{{journeyParent.summary}}. The panel on the right lists the request's fields as smart values (placeholders that Jira fills in from the request), and each one copies when you click it. - Click the Reporter field and paste
{{journeyParent.reporter}}. A dropdown group From journey parent offers Reporter; select it. The field now shows a Reporter chip. - Select Add work item. The item appears under the request card.
- Select the round + under the last item, then Add work item. Repeat steps 4 to 7 for
Collect equipmentandDisable accounts on last day.
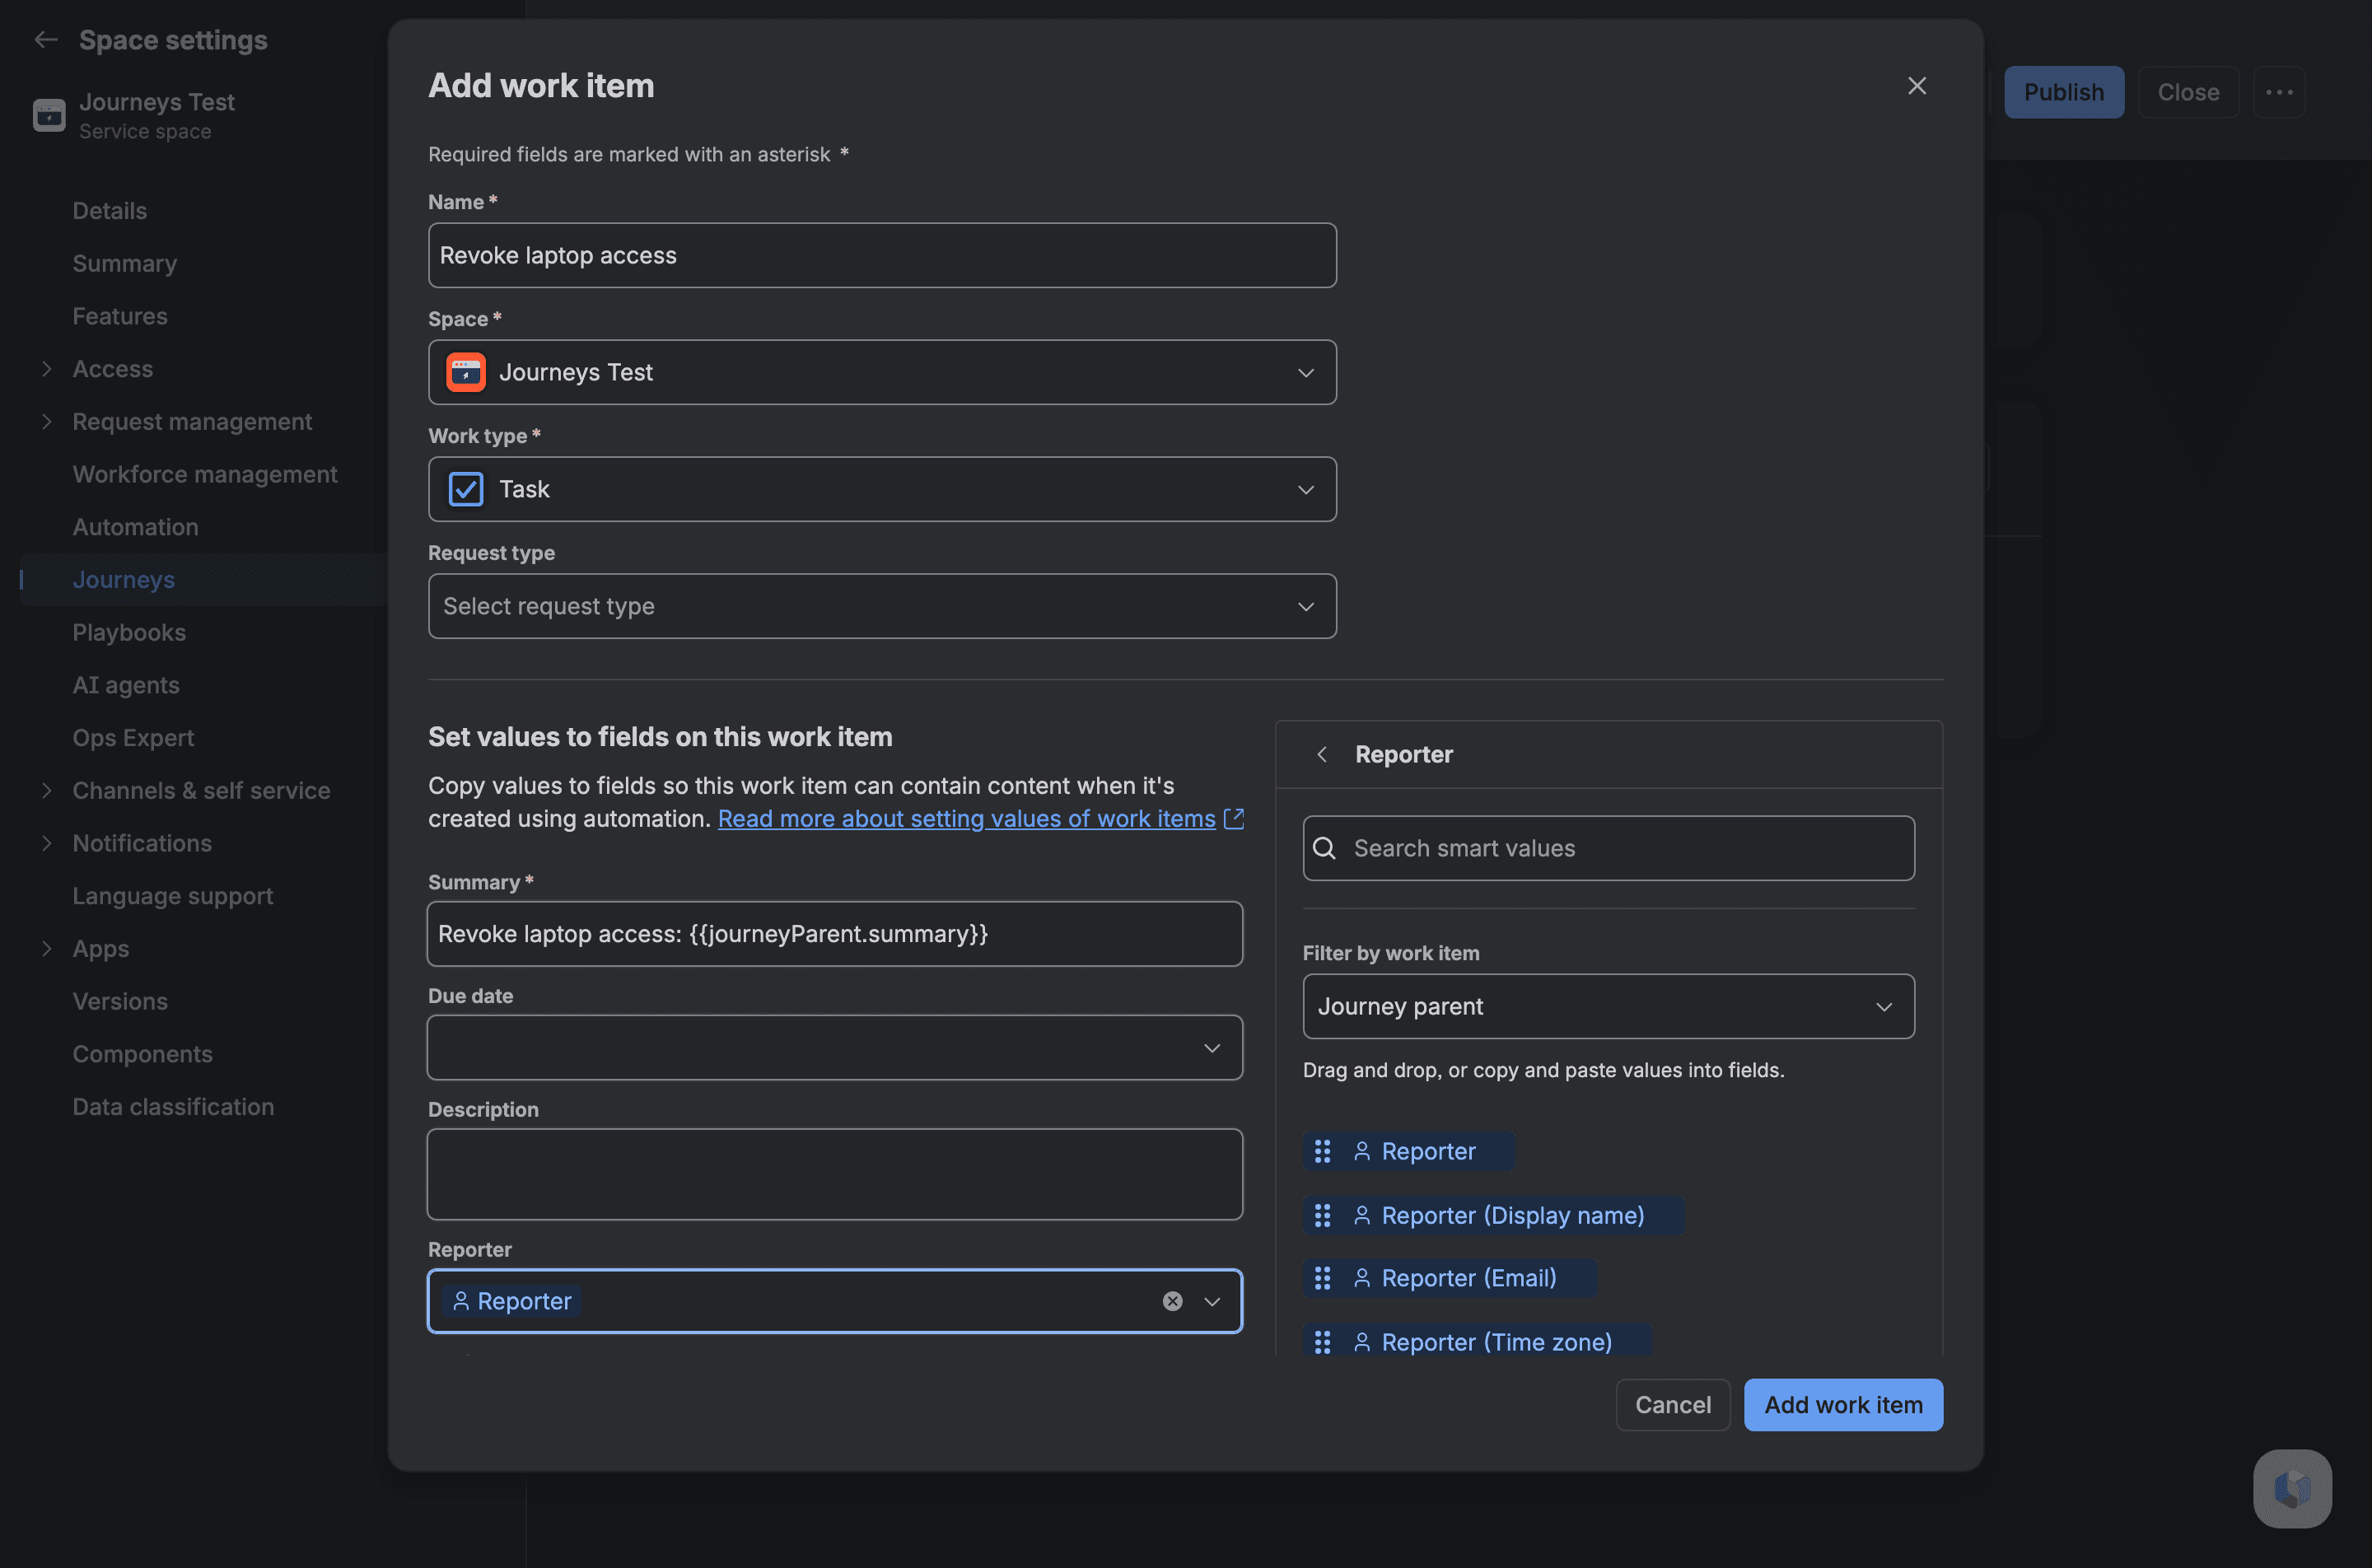
You should see three Task cards under Offboard an employee, each with Space set to your space.
We left the Reporter empty on Collect equipment on purpose, to see what Jira does. On our 7 test requests (JNY-1 and so on, JNY being our test space's key), all 7 Collect equipment items came out with our admin as Reporter. That included JNY-23, whose request the Automation app had raised, so an empty Reporter comes from the journey's actor and not from whoever raised the request. We had also left the Reporter empty on Disable accounts in that first version, and its 2 items (JNY-10 and JNY-20) got the admin too. I'd fill the Reporter on all of them. If someone forgets, Step 5 adds a safety net.
Step 3: Add conditions to the journey type from the termination date
The goal: create Disable accounts on last day only when the last working day is today or already past.
- On the Disable accounts on last day card, open the ••• menu and select Add condition. The "Add condition to work item" dialog opens.
- In First value, paste the request's date field from the smart values panel. On our site, Last working day copied as
{{journeyParent.customfield_10381}}; your field number will differ. - In Condition, select less than.
- In Second value, type
{{now.plusDays(1).jiraDate}}, then select Update.
You should see a yellow Create if condition is met label above the item in the builder. Behind the scenes the journey's automation rule stores it as a plain comparison; this is the condition as our site's automation API returned it after publishing:
1{"first":"{{journeyParent.customfield_10381}}","second":"{{now.plusDays(1).jiraDate}}","operator":"LESS_THAN"}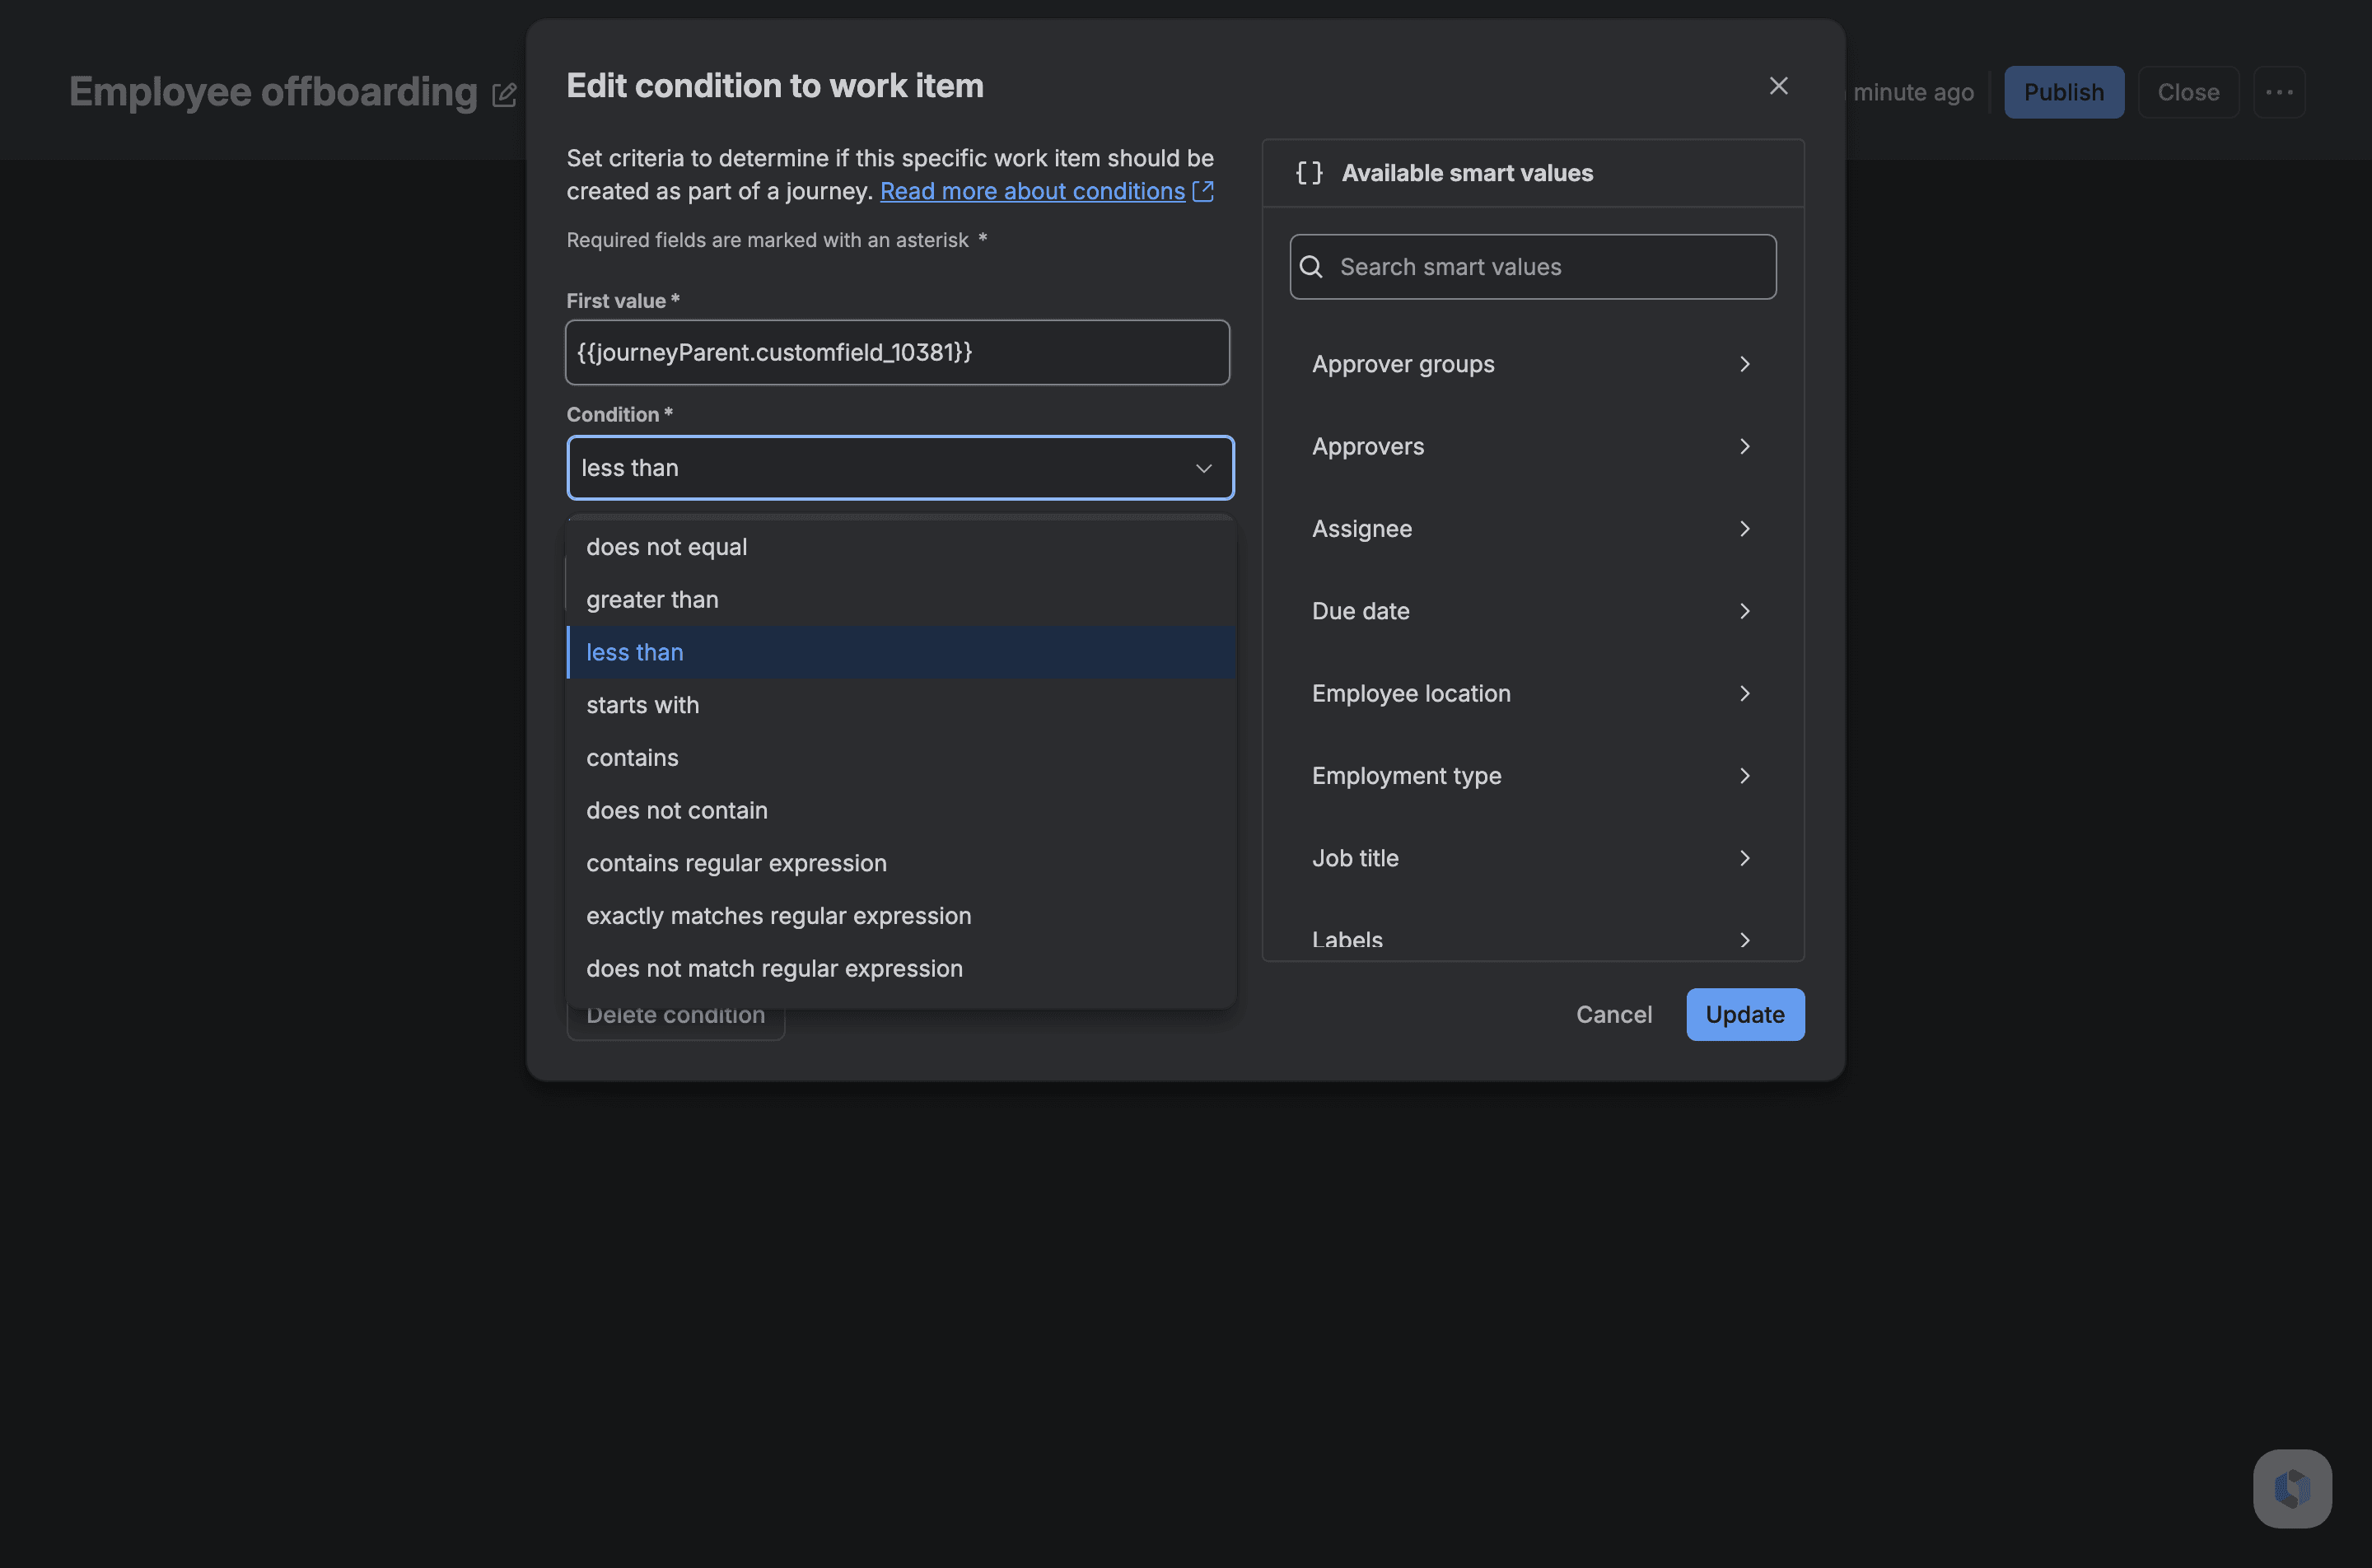
Write 'on or before today' as less than {{now.plusDays(1).jiraDate}}
The Condition list has 10 operators: equals, does not equal, greater than, less than, starts with, contains, does not contain, contains regular expression, exactly matches regular expression and does not match regular expression. There's no "less than or equal". So you ask for "last day is before tomorrow". For a date field that means the same as "on or before today". {{now.plusDays(1).jiraDate}} gives tomorrow's date in the form 2026-11-12, built from two pieces Atlassian documents on its date smart values page.
Our test requests came out like this:
Request | Last working day | Raised (UTC) | Disable accounts item |
|---|---|---|---|
JNY-17 | 2026-11-09 | 2026-11-10 23:16 | created (JNY-20) |
JNY-1 | 2026-11-10 | 2026-11-10 23:02 | created (JNY-10) |
JNY-2 | 2026-11-11 | 2026-11-10 23:02 | not created |
JNY-3 | 2026-11-25 | 2026-11-10 23:02 | not created |
Look at JNY-2. We raised it at 01:02 on 11 November in Bucharest, so its last day was "today" for us. But Atlassian's doc says {{now}} "Returns the current date and time in UTC+00:00", and in UTC it was still 10 November. So JNY-2 got no Disable accounts task. That surprised us.
Working from that doc line (we only measured the east-of-UTC case), the journey condition is off by a day for part of each day. East of UTC, a request whose last day is today and that is raised before UTC midnight has passed (in November, before 02:00 in Bucharest and before 11:00 in Sydney) doesn't get the task from the journey; the Step 6 rule picks it up on its next run. West of UTC, a request raised in the evening for tomorrow gets the task a day early. Neither case shows an error. {{now.convertToTimeZone("Europe/Bucharest").plusDays(1).jiraDate}} with your own zone should line the two up, but our runs used plain {{now}} only.
Step 4: Publish the draft, then edit a published journey type
- In the builder, select Publish. A dialog asks "Publish journey type?".
- Read the line under it: the journey "will immediately become active and run once triggered". Then select Publish. The label changes to Published, and the journeys list shows it under Active.
- To change it later, open the journey and select Edit. Change the item or condition you need, for example an item's description.
- Select Publish again. Until you do, the view page shows Unpublished changes and new requests still run the published version.
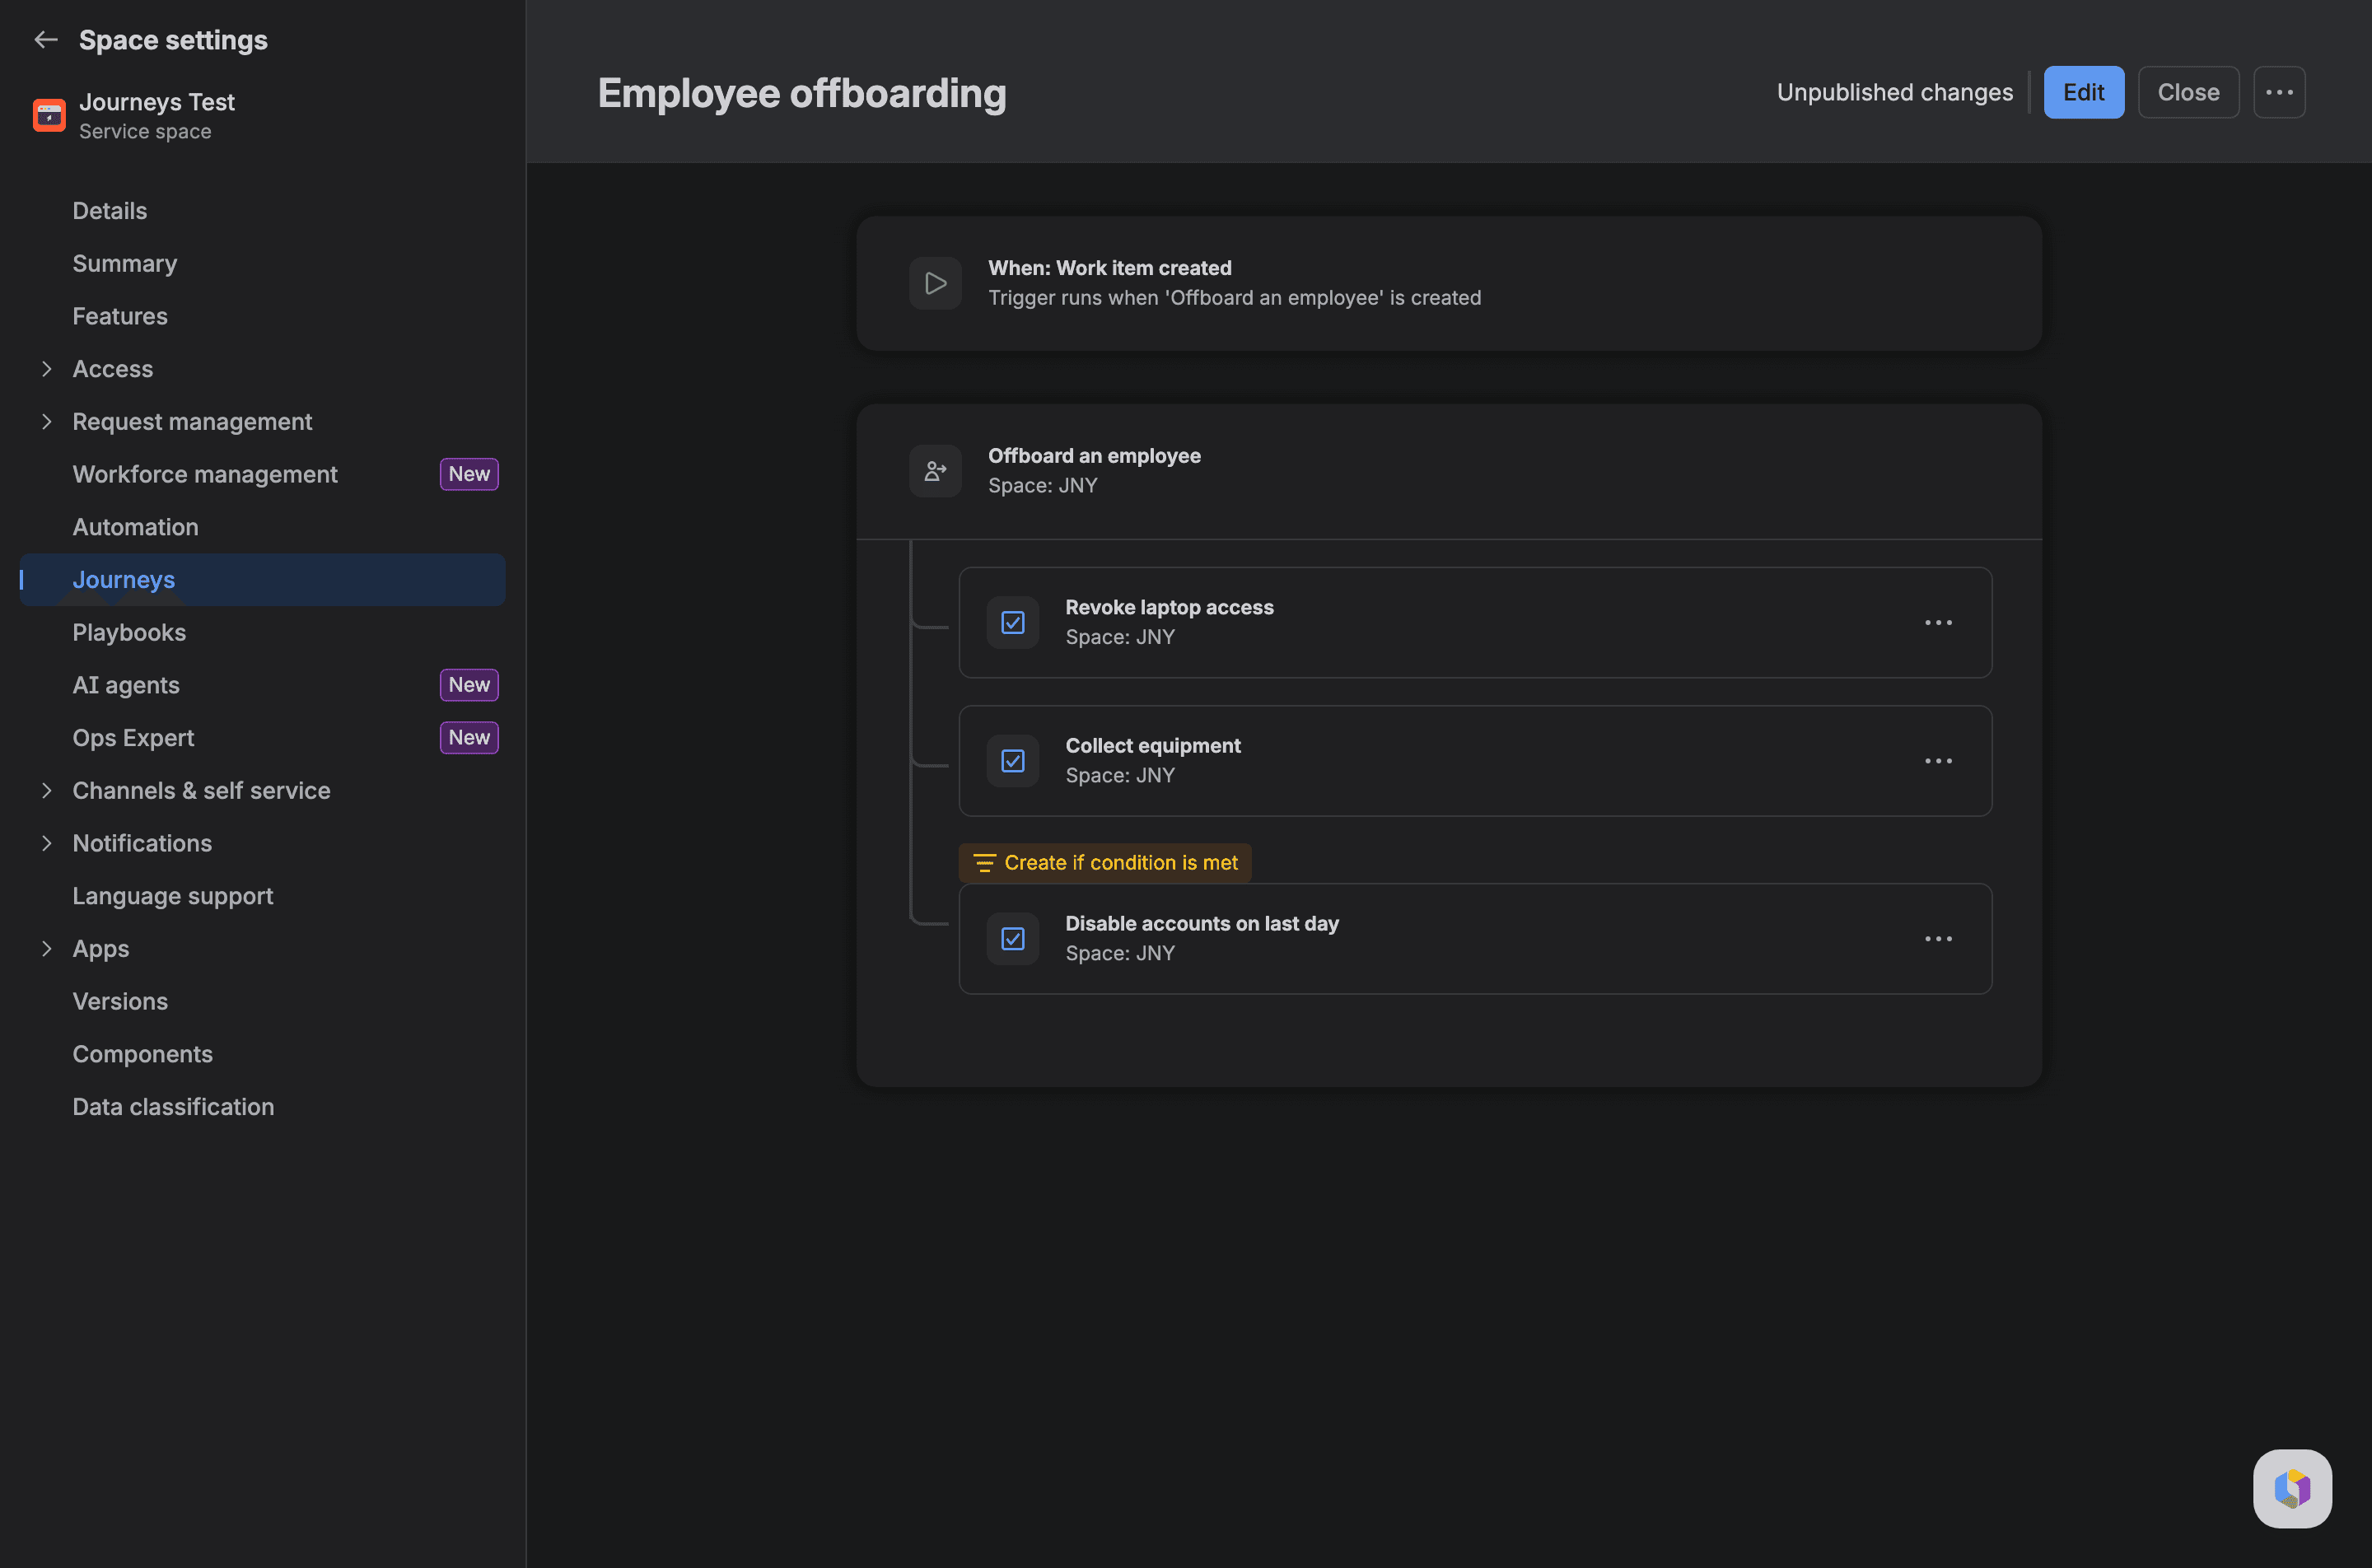
You should see a new rule in automation each time you publish. On our site, the second publish created an enabled rule called "Employee offboarding - Journey V2" and switched V1 off.
Atlassian's Edit a published journey type page says new changes "won't affect existing journeys that may already be running". Public bug AUTO-2496, opened 18 September 2026 and In Progress, says the opposite: disabling the old version aborts the runs still in flight, with "no known workaround". If a journey has waiting items (dependencies that haven't been met yet), publish edits when few requests are open.
What Jira Service Management journeys can't do yet
After Step 4 the Reporter is still wrong on any item where it was left empty. Editing the journey's own rule in automation doesn't help, since Atlassian says edits there aren't synced back and the next publish replaces them. Dates are the other gap. Conditions, the builder option we tested, don't set a creation date, and Atlassian's dependencies doc describes waiting for a status, not a date. A Delay action can't help either, since it is capped at 15 minutes per step and 60 minutes per rule.
Both fixes are separate automation rules. Atlassian now calls rules "flows" on some screens, so you'll see both words below.
Step 5: Change the reporter on journey work items with Jira automation
Optional: you need this if some items keep an empty Reporter, or if you'd rather not republish a live journey (see AUTO-2496 above) to add {{journeyParent.reporter}}.
- Go to Settings (the gear) > System > Automation and create a rule. We used this page because the space's own Automation page showed "Legacy Automation is not available for this site" on our site.
- As the trigger, choose Work item linked with all link types. The journey adds the link 3 to 10 seconds after it creates the item, so a Work item created trigger would find no request to read from.
- Add three Compare two values checks, in this order:
First value | Check | Second value | Why |
|---|---|---|---|
{{issue.issuetype.name}} | equals | Task | for a journey link, {{issue}} is the new task |
{{destinationIssue.issuetype.name}} | equals | Employee offboarding | {{destinationIssue}} is the request; Employee offboarding is the HR template's work type for it (it shares the name with our journey type by chance) |
{{issue.reporter.accountId}} | does not equal | {{destinationIssue.reporter.accountId}} | stops the rule when the Reporter is already right |
- Add Edit work item fields and set Reporter to
{{destinationIssue.reporter}}. - Open the rule's Settings panel and set the scope to your service space and the actor to a named admin account.
- In the same panel, turn on the trigger setting that allows other flows to trigger this one (in the rule's JSON it's
canOtherRuleTrigger: true). The journey's own rule creates the link, so without it the rule never runs. - Save the rule and turn it on.
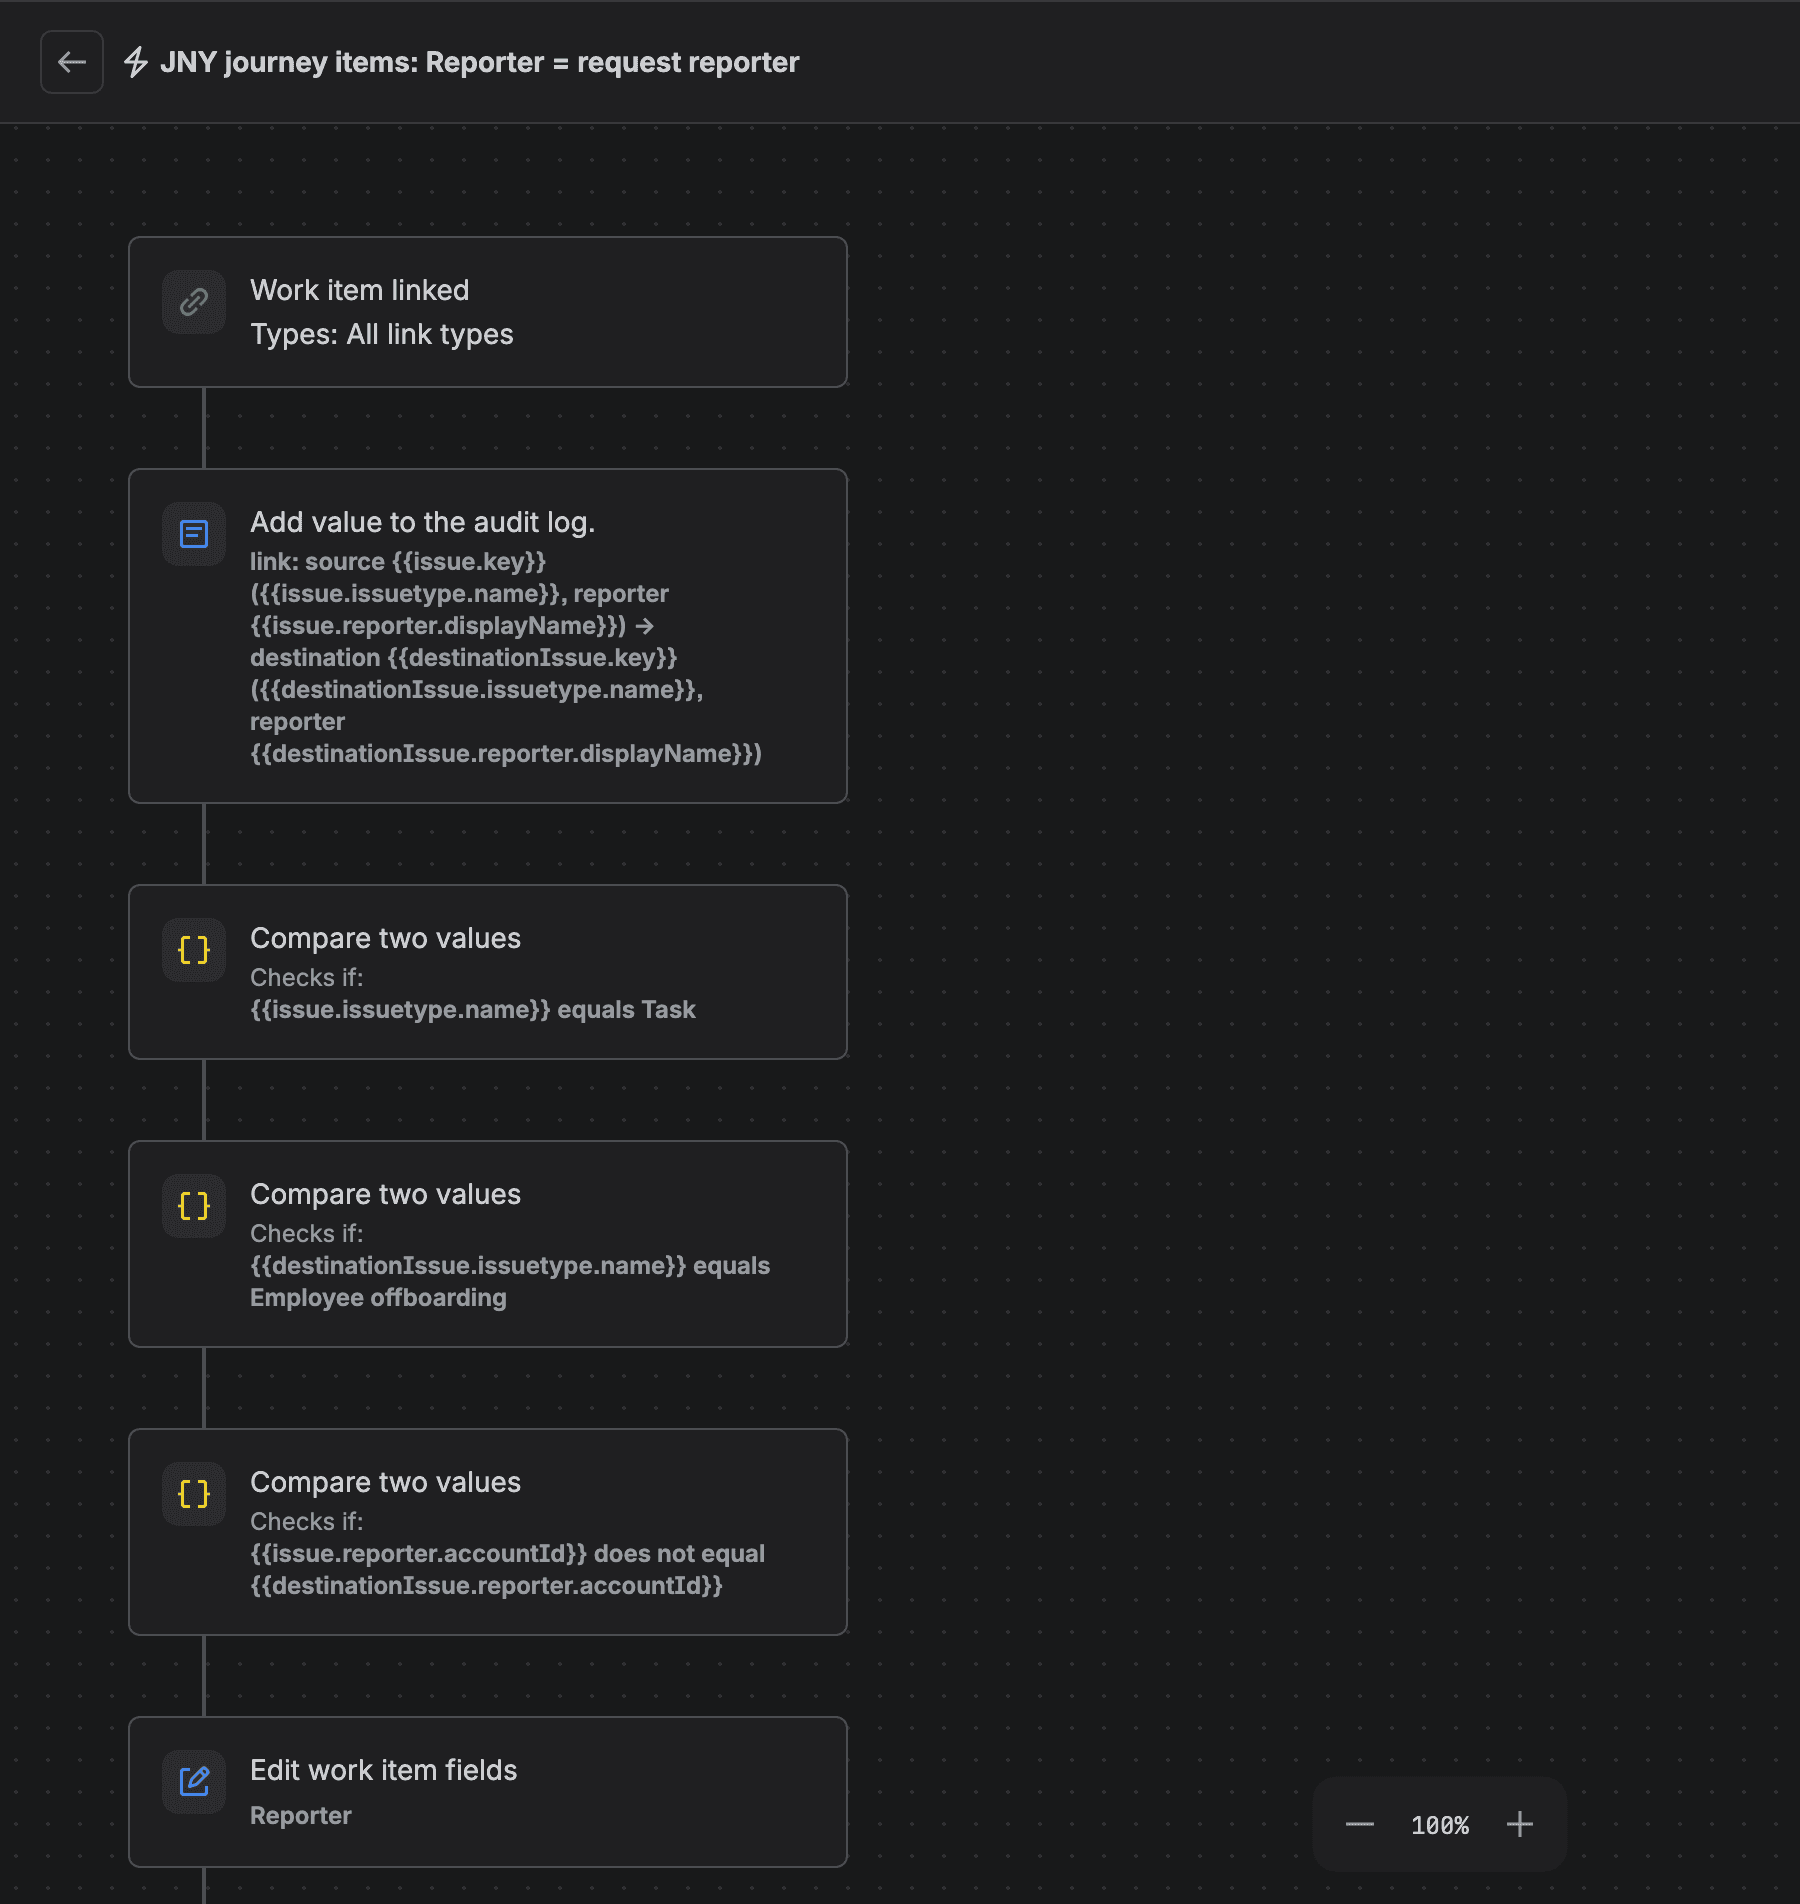
You should see the change in the task's history a few seconds after the link appears. For request JNY-17, task JNY-19 was created with our admin as Reporter. To read its history without clicking around, we ran this against the REST API (set EMAIL to your Atlassian e-mail and API_TOKEN to an API token, and swap in your site and key):
1curl -s -u "$EMAIL:$API_TOKEN" \
2  "https://wolfaenpak.atlassian.net/rest/api/3/issue/JNY-19/changelog" \
3 | jq -r '.values[] | .created as $t | .items[] | "\($t) \(.field): \(.fromString) -> \(.toString)"'12026-11-11T01:17:14.272+0200 Link: null -> This work item relates to JNY-17
22026-11-11T01:17:17.185+0200 reporter: Mihai Perdum -> Dana RoweThe link comes first. Then the Reporter changes to Dana Rowe, our test requester, 3 seconds later. The rule doesn't touch items created before it existed. It also fires on links that other rules add: it ran on the Step 6 rule's link and stopped at the Reporter check. So a Task someone links to an offboarding request by hand would most likely get the request's Reporter as well, and a trigger limited to Relates links won't stop that when the hand-made link is a Relates link too. The audit-log step in the screenshot is optional; we added it to see each link's source and destination.
With the default actor, Automation for Jira, our first two runs ended in "Some errors" with the key com.codebarrel.automation.trigger.event.cant.resolve. After we switched the actor to a named admin, all the later runs succeeded. We didn't pin down why: the same app account raised a request without trouble later, so it may be timing and not permissions.
Step 6: Create future-dated work items with a scheduled Jira automation rule
This rule runs once a day, looks at open offboarding requests, and creates Disable accounts on last day for any request whose day has come and that doesn't have one yet.
- In Settings > System > Automation, create a rule with the Scheduled trigger set to daily at 6:00 AM in your time zone (see the run-time note under this list if you're east of UTC+6).
- In the trigger, turn on the option to run a JQL search (JQL is Jira Query Language) and enter
project = JNY AND issuetype = "Employee offboarding" AND statusCategory != Done, with your space key in place of JNY. The rule then runs once per matching request. - Add Compare two values:
{{issue.customfield_10381}}less than{{now.plusDays(1).jiraDate}}, with your date field. - Add Lookup work items with
project = JNY AND issue in linkedIssues({{issue.key}}) AND summary ~ "Disable accounts on last day". This finds a task the journey or an earlier run already made. - Add Compare two values:
{{lookupIssues.size|0}}equals0. - Add Create work item: Task in your space, Summary
Disable accounts on last day: {{issue.summary}}, Reporter{{issue.reporter}}. - Add Link work items: relates to the most recently created work item. Save and turn it on.
Run time: from UTC-12 to UTC+6, 6:00 AM works as is. Further east, run the rule at or after the hour of your UTC offset (11:00 AM in Sydney at UTC+11), or it still sees yesterday's UTC date and creates the task a day late.
Optional: we also added two Log action steps (one after the lookup, one after the link) so the audit log says what the rule found; the log lines in the table below come from them. Atlassian's triggers doc also says a scheduled rule switches itself off after 10 failed runs in a row, so check its audit log in the first week.
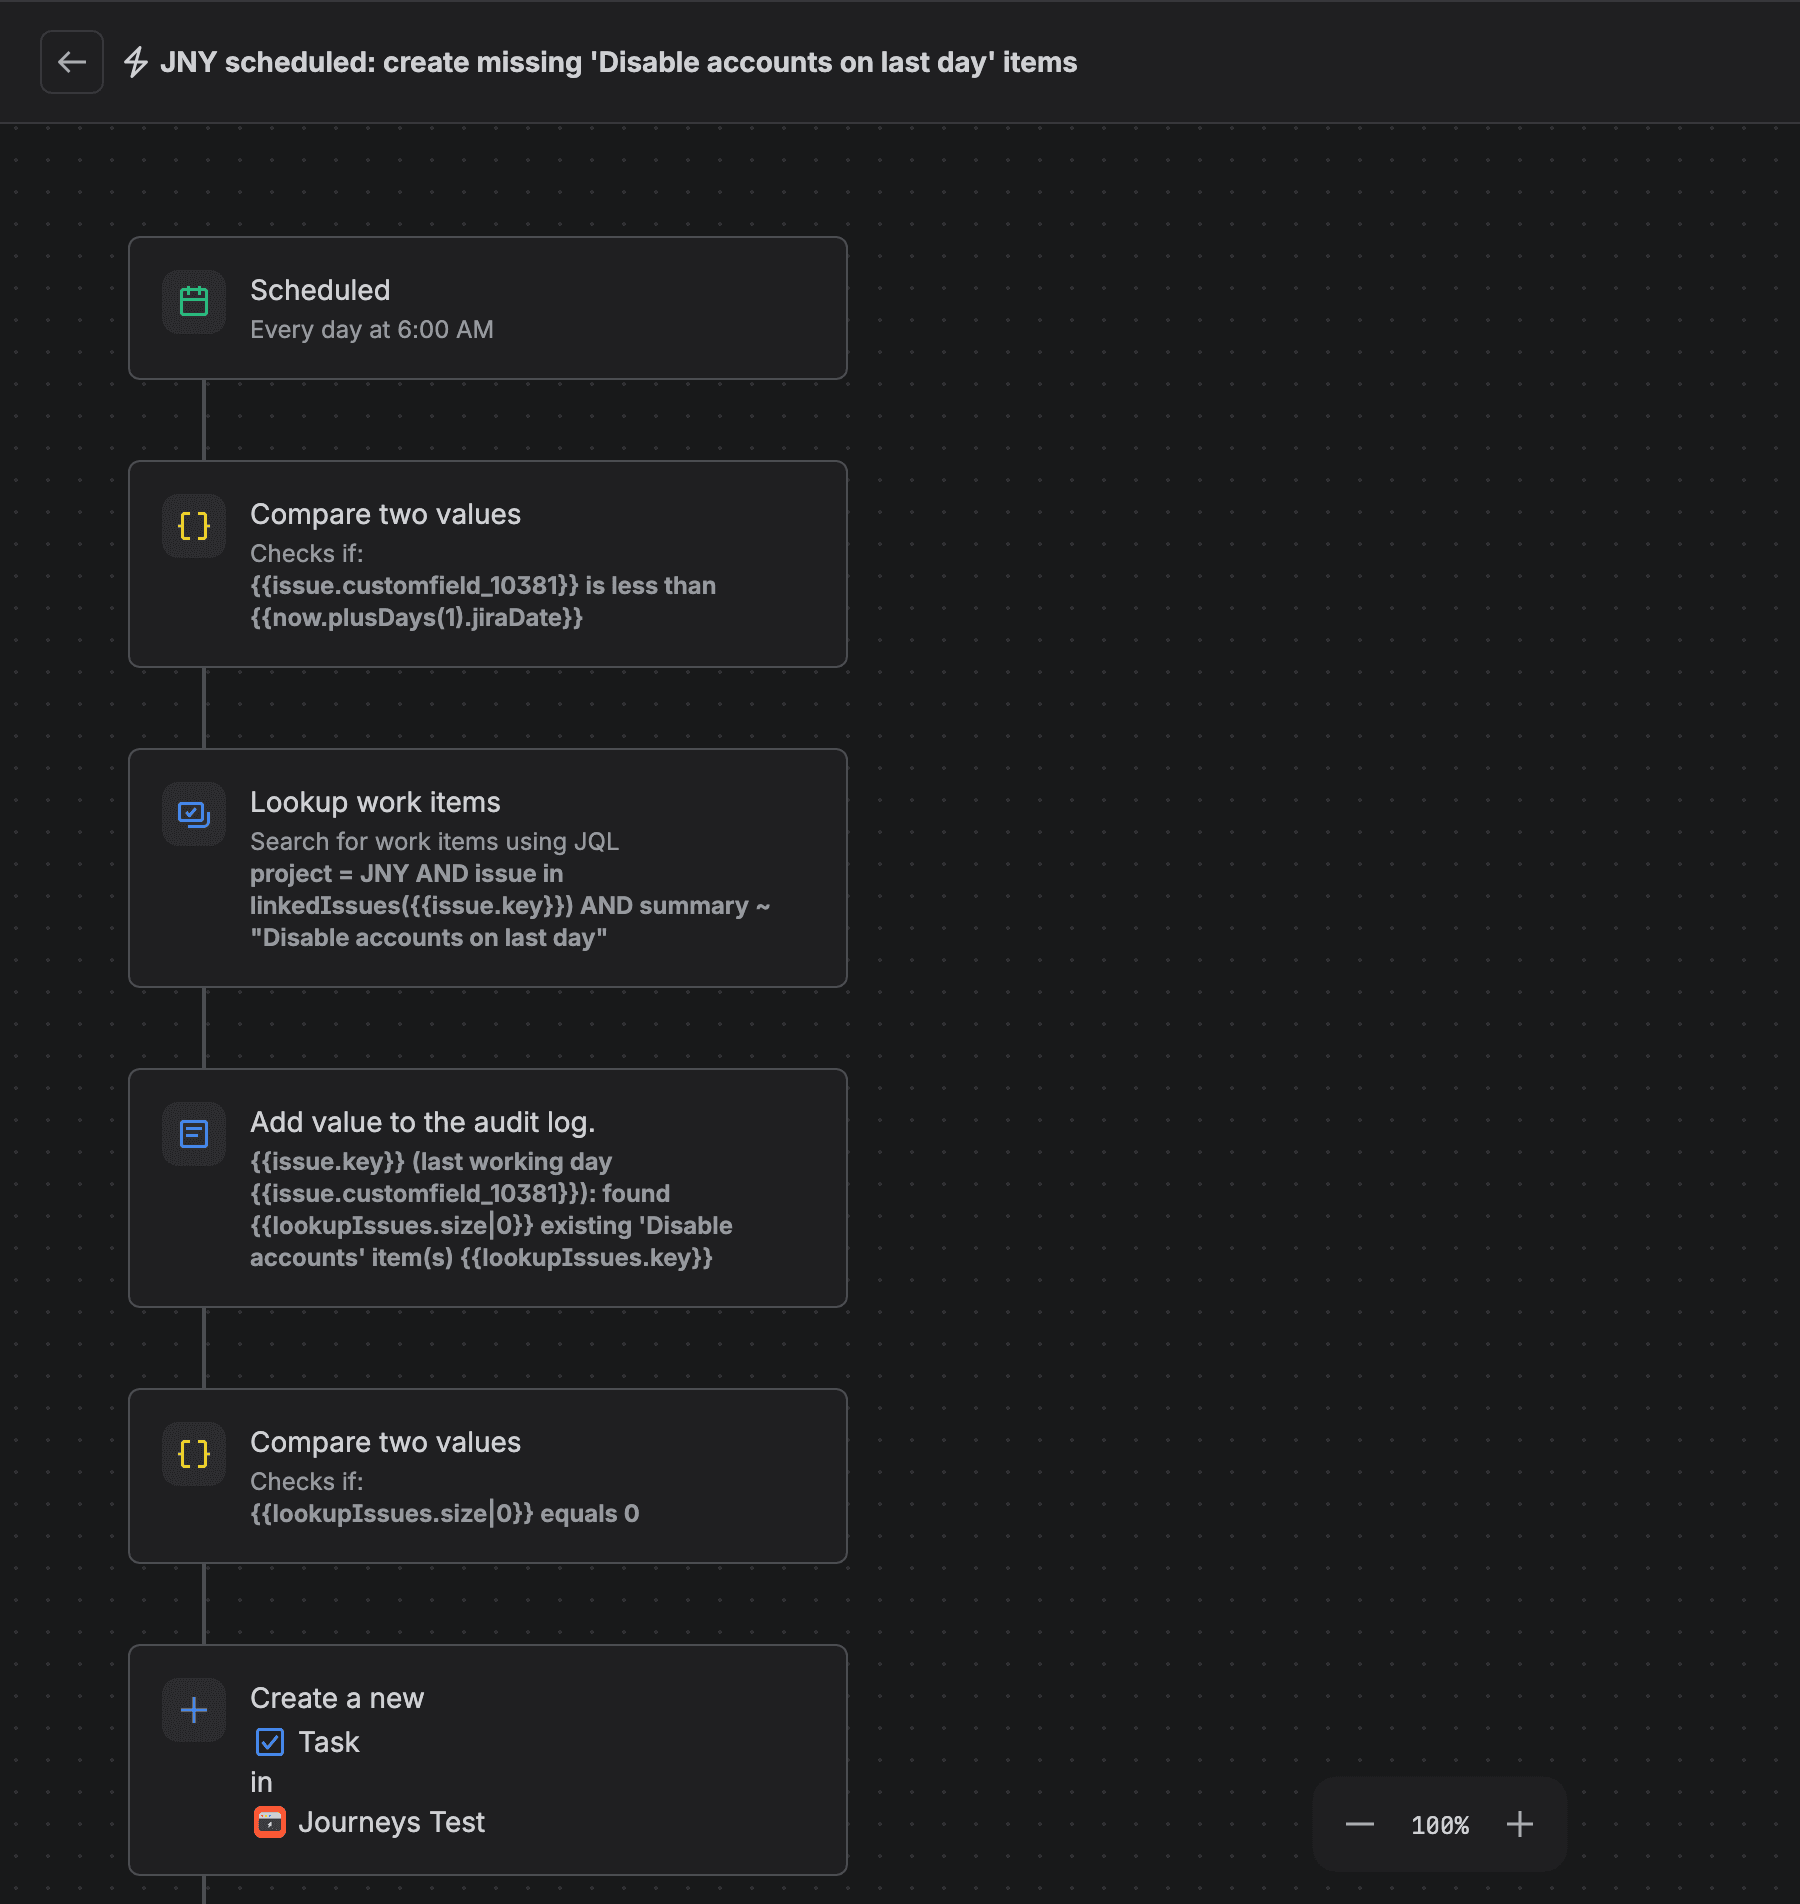
We wanted the date test in the trigger's JQL, which has the <= operator journeys lack. On our site the HR template's Last working day field couldn't be searched: "Last working day" <= endOfDay() returned "Your query couldn't be processed. Make sure it's valid and try again later.", and the JQL autocomplete listed the field with no operators. So the comparison moved into step 3.
To test it, open the rule's ••• menu and select Run scheduled flow now, then open the Audit log.
Run (UTC) | What the log said | Created |
|---|---|---|
10 Nov, 23:23 | JNY-1 and JNY-17 already had their task; JNY-2's day hadn't come in UTC | nothing |
11 Nov, 00:01 | JNY-2 found 0 existing tasks | JNY-24 for JNY-2 |
11 Nov, 00:02 | JNY-2 found JNY-24, JNY-17 found JNY-20, JNY-1 found JNY-10 | nothing |
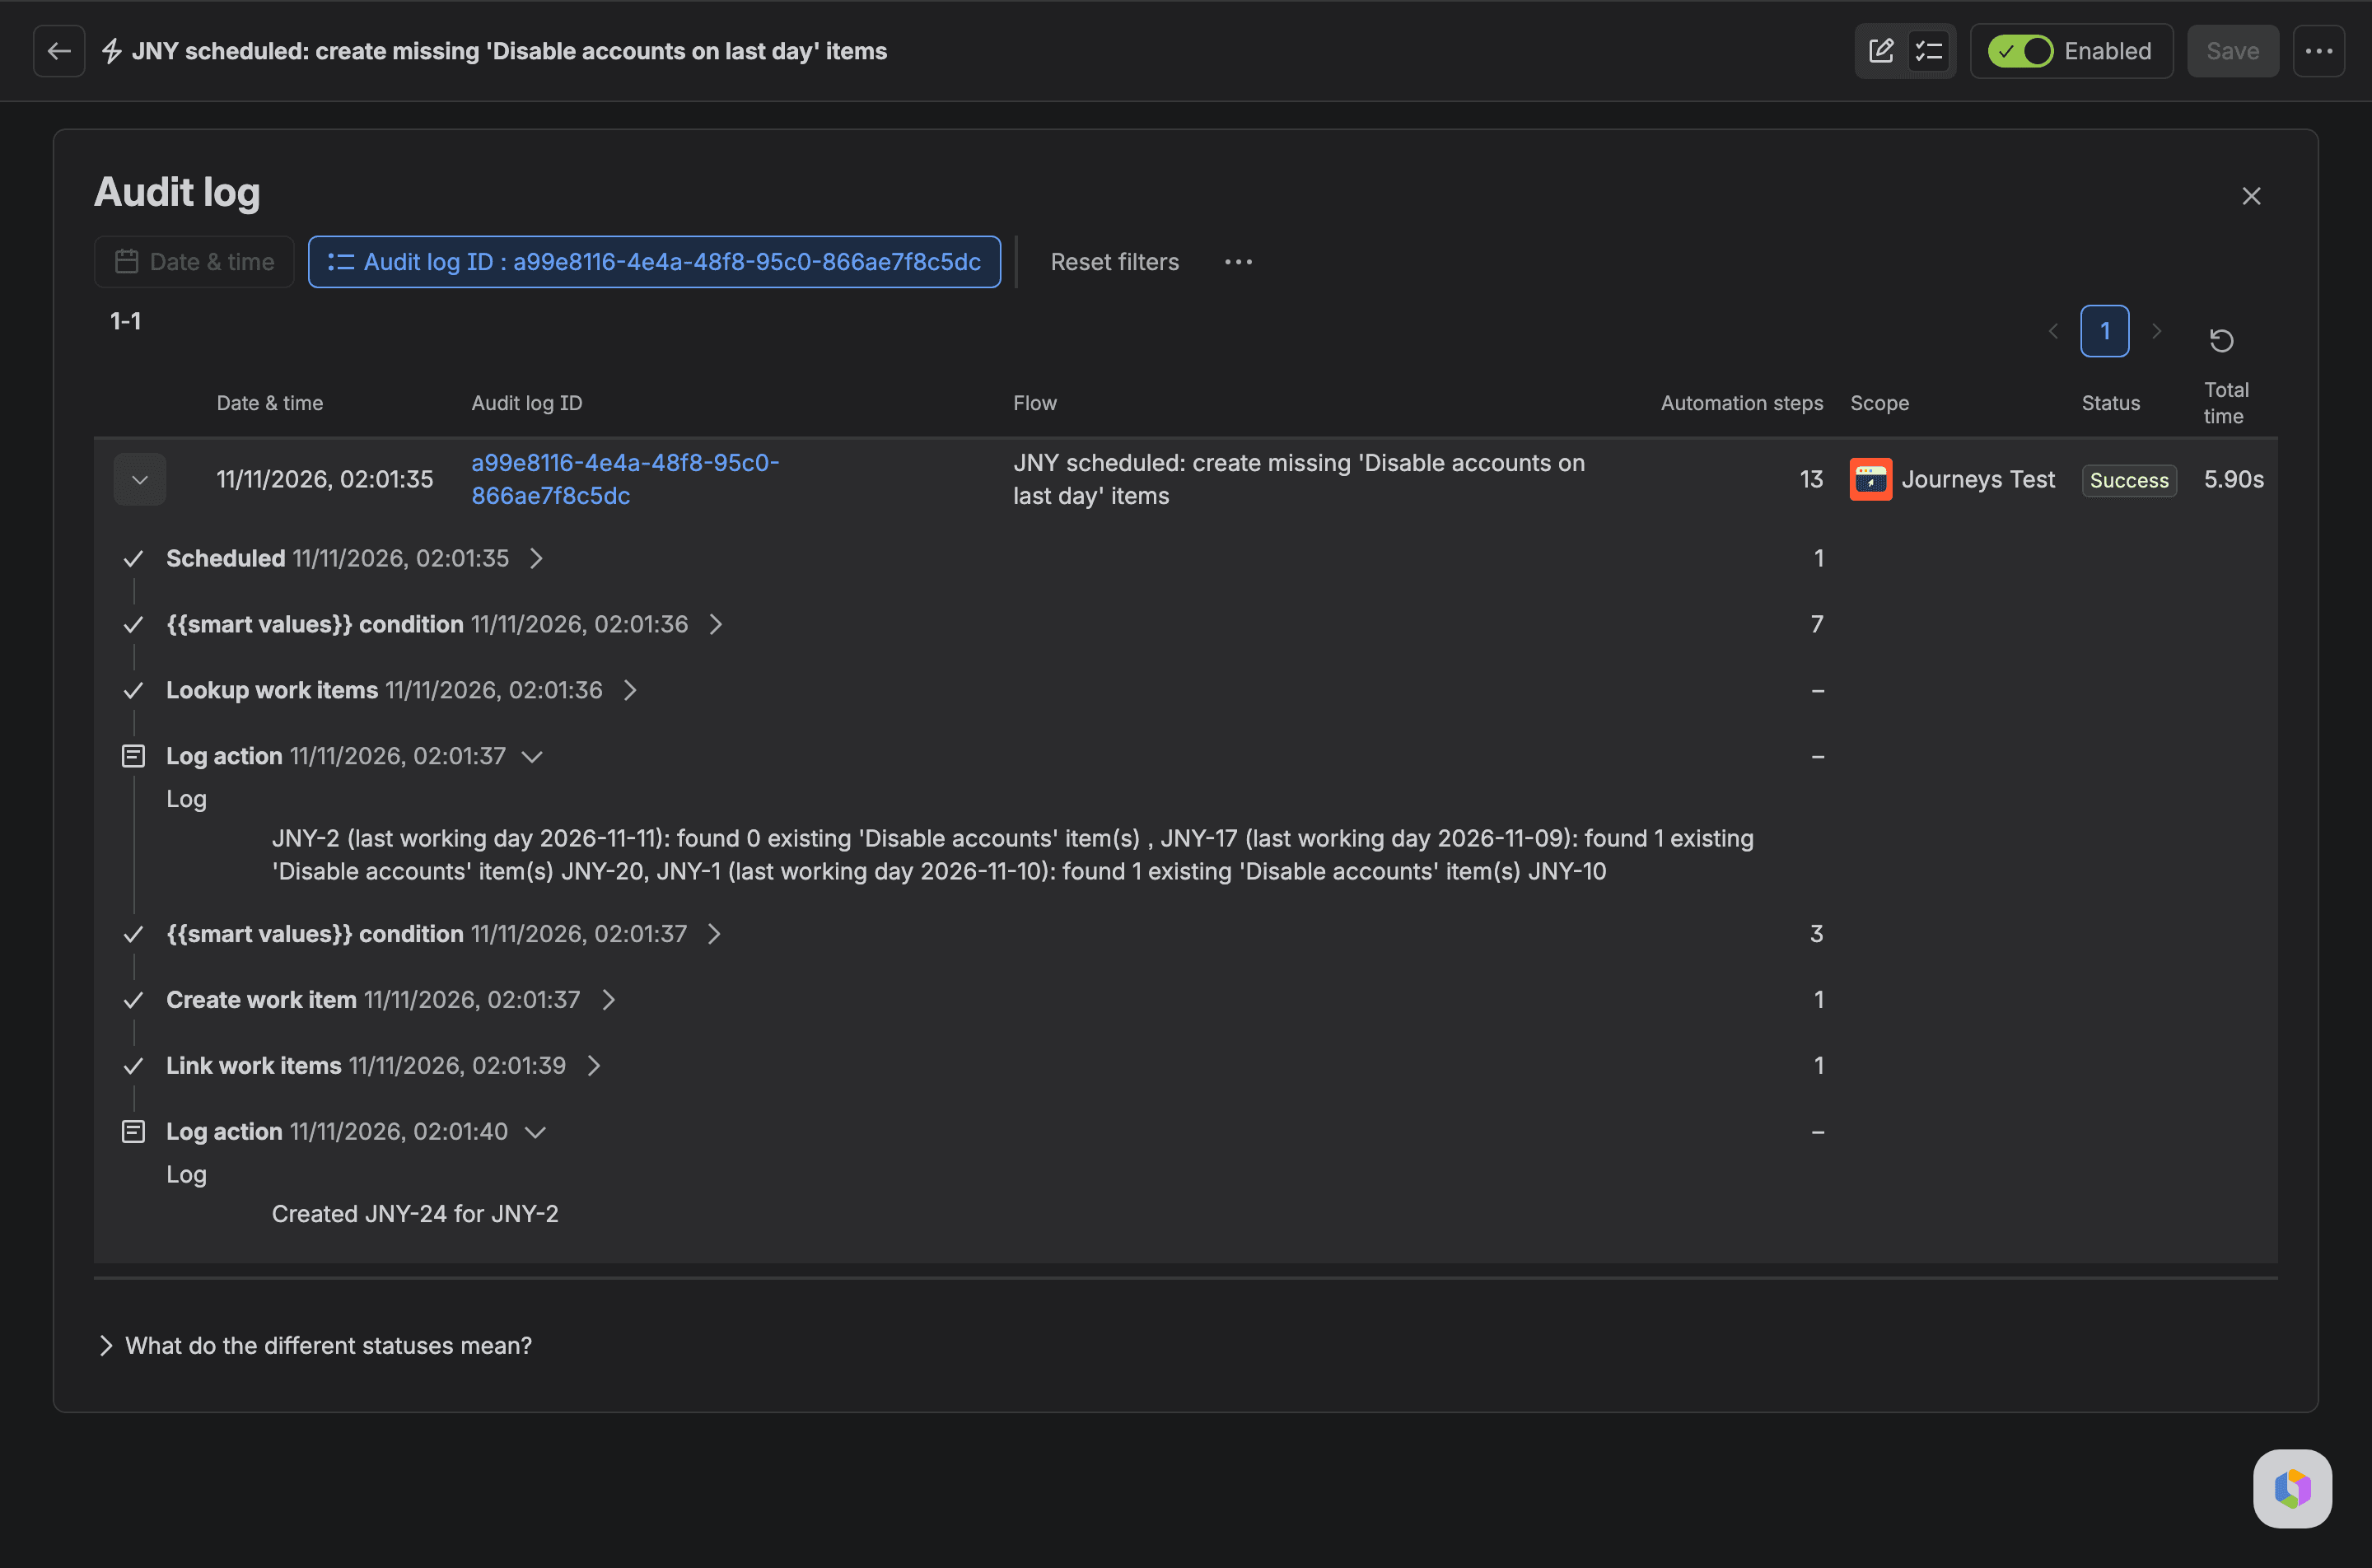
You should see one new task per request whose day has come, and no duplicates on later runs. Run 2 took 5.9 seconds. The requests due on 25 and 30 November failed the date check on every run they were part of.
Check it: raise one request and count the tasks
Raise the test request as someone other than the admin who published the journey, for example a portal customer, or the Reporter check below proves nothing. On the portal, raise Offboard an employee with Last working day set to yesterday's date. Wait about a minute and open the request. It should have the three tasks from Step 2 linked to it, and each should show the customer as Reporter. Atlassian's Track in-progress journeys page says the request's journey panel also lists items that weren't created because a condition wasn't met; we didn't open that panel ourselves.
Then raise a second request with a last day a week out. That one gets two tasks. To see the third without waiting a week, edit its Last working day to yesterday and use Run scheduled flow now on the Step 6 rule. The task appears, linked to the request, and a second run makes no copy.
If something doesn't work
"Your query couldn't be processed. Make sure it's valid and try again later." is a general JQL error, and on our site it came up whenever Last working day was in the query. The JQL autocomplete listed it, and Resignation date too, with no operators, so compare the date in a Compare two values step.
"Some errors" with com.codebarrel.automation.trigger.event.cant.resolve on the Reporter rule went away for us when we changed the rule's actor from Automation for Jira to a named admin.
"Legacy Automation is not available for this site" on the space's Automation page is what we got too. Build the rules from Settings > System > Automation and set their scope to the space.
If the dated task never appears on a request whose last day has passed, check that the condition's First value points at your date field and not ours, that the request has a last working day at all, and that you published again after editing the journey.
"Please provide a value for required field ..." when automation raises an offboarding request means the request type's required fields apply to automation as well. We hit it with a required description field and fixed it by filling the description.
What journeys cost in automation steps
The audit log counted our journey runs as automation steps: 17 steps for a request that got two tasks, 22 for one that got all three. The scheduled rule used 9 to 13 steps per run with 6 to 7 open requests, and the count grows with the number of open requests. Atlassian's usage page says usage-based automation billing starts on 3 December 2026 and counts each step that runs. It doesn't mention journeys, though, so we can't tell you yet whether journey runs count against the allowance. Our steps per rule measurements show how to read those numbers for your own rules.
When to use the journey condition and when to use the scheduled rule
If the date is known when the request comes in and the task should exist straight away (or never), the journey condition from Step 3 is enough. When an offboarding request comes in before the last day, use the scheduled rule from Step 6 for the dated task. I'd keep the journey condition too, so a request raised late still gets its task at once. I think most HR teams will want both. And if the task should wait for another task to finish, a journey dependency does that without any rule.
Journey runs go through automation, so the actor question from Step 5 also comes up when you migrate rules; we covered that in what the Jira Cloud Migration Assistant does to a rule's actor. And Premium is a real cost line for a service team; our Jira Service Management cost per agent piece has the numbers for 10, 50 and 100 agents.
What you have now
Key takeaways
- What you built. An Employee offboarding journey type that links up to three tasks to each offboarding request, with the requester as Reporter, plus two rules: one copies the Reporter, one creates the dated task when the last working day comes.
- What to check first on yours. Raise one request as a portal customer with yesterday as the last day, and one with next week, then run the scheduled rule by hand.
- What this doesn't cover. Dependencies, Request Resolver, filling Due date from the last working day, the time-zone smart value, an item's own Add Automation rule option and a builder who isn't the publisher. We didn't test those.
If you build this and your site behaves differently, tell me in the comments under Atlassian's Journeys now in features post. Journeys change often and I'd like to know :)
Comments
0Add a comment